Chapter XXXI. Lesson XXII. Etching Single Figures From Groups
Description
This section is from the book "Complete Self-Instructing Library Of Practical Photography", by J. B. Schriever. Also available from Amazon: Complete Self-Instructing Library Of Practical Photography.
Chapter XXXI. Lesson XXII. Etching Single Figures From Groups
490. The separating of single figures from groups occurs most frequently when copying from old group pictures, yet there are times when single pictures are desired from group pictures, perhaps only recently made. Or there may be cases where the group is not satisfactory, but some single figures are good and prints are ordered from them, thus requiring the separating of a single figure from the remaining members.
491. In Illustration No. 31 we present the results of copying a single figure from a group of two figures made from a very badly marred ambrotype. In Fig. 1 of this illustration we present a reproduction from the original; in Fig. 2 we show the first stage of the work; Fig. 3 illustrates the second stage of the work, while in Fig. 4 we present the completed portrait.
492. Beginning on work of this kind, first proceed to remove the surrounding subjects or objects from about the shoulders and head. In this case the first work performed was the separating of the child's face from the mother's shoulder and giving a natural outline to the waist and shoulders. This was done by first outlining the shoulders with the point of the etching knife, shaving the film into the face of the child. This completes the first stage.
493. For the second stage block out the entire print by painting out the surroundings with Strauss Marl, or any opaque may be used. For the first stages of the blocking the outline is traced very closely with the fine line of
the brush, and the broader surfaces are then painted in promiscuously. While the blocking out may be done on the glass side of the negative, yet it is better to do this work on the film side, for unless care is exercised in printing, when the blocking is done on the glass side, one is very apt to print a double line. This can only be avoided, under such circumstances, when the printing-frame is placed at a direct angle with the sun. So, to avoid this difficulty, the blocking may be done on the film side. This completes the second stage.
494. The final stage is accomplished in printing by the vignetting process. First, cut out an opening in a cardboard the shape of the image on the negative; then, covering this opening with fine tissue-paper, place this mask over the printing-frame, adjusting it to the negative. The opening in the vignetter is cut off just below the bust, and in order to gradually blend into the paper a little absorbent cotton is placed underneath the vignetter, at the lower edge, which permits the light to filter through the cotton and give a gradual blend to the printing. Platinum paper is the best to use for this purpose. As this has a coarse, grainy surface it does not show the lines of copying so much as the closer grained papers do, and it also vignettes much softer.
495. After the paper is printed to the full depth, it is developed, washed and dried. After drying, the sharp edges are slightly blended by rubbing over the surface of the print with a tuft of cotton applied to a little crayon sauce. It requires but a very small amount of the crayon sauce to produce the necessary results, and it is better to apply too little than too much, for if the work is not applied sufficiently heavy, it may be gone over again. The rubbing in of the crayon sauce, softening the lines and slightly clouding the background, completes the picture, as will be seen in Fig. 4 of this illustration.
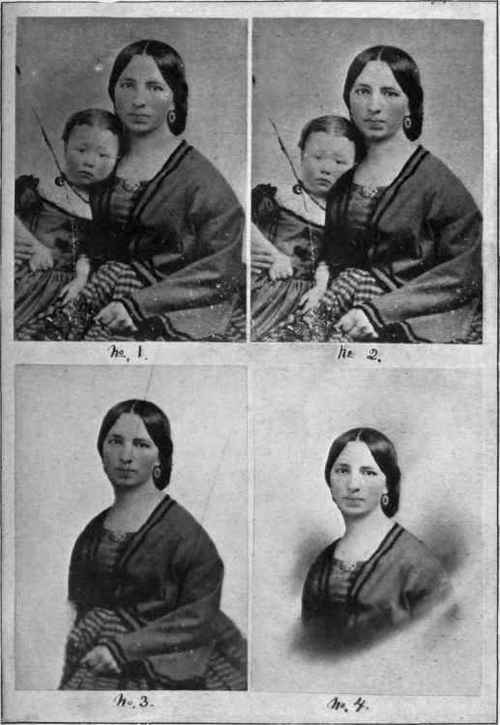
Illustration No. 31. Etching Single Figure from Groups.
See Paragraph 491.
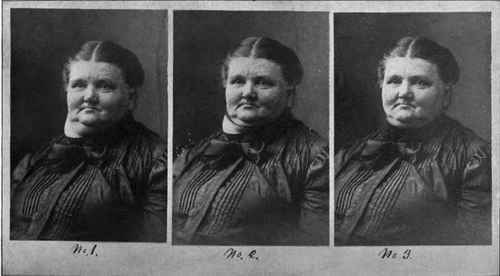
Illustration No. 32. Etching Thick Necks.
See Paragraph 497.
Continue to:
My Books

