Photo-Micrography. Practical Manipulations For The Beginner. Part 6
Description
This section is from the book "Complete Self-Instructing Library Of Practical Photography", by J. B. Schriever. Also available from Amazon: Complete Self-Instructing Library Of Practical Photography.
Photo-Micrography. Practical Manipulations For The Beginner. Part 6
750. Developing
Developing. With your developer and fixing bath prepared and your ruby light turned low, remove the plate from the plate-holder. In doing so, stand with your back to the light, so as to shield the plate from the light. Place the plate in the developing tray, rocking gently for a moment, then cover the tray with a piece of dark cardboard. Do not examine it for at least two or three minutes, or until development is very nearly completed, and then only by very feeble ruby light, or at some distance from the ordinary ruby light, and only a second at a time.
751. When you consider the negative fully developed, the plate can then be examined nearer the light. If, upon examination, however, you find it is not completely developed, return it to the tray and again cover with the cardboard. When the development is completed, rinse the plate in clean water, to remove the adhering developer, and place in the hypo tray; allow the plate to remain in this solution for at least fifteen minutes, or until all milkiness has disappeared; then, place in the washing box and allow to wash for at least a half an hour. If no running water is at hand the plate can be placed in a tray of clean water for three or four minutes; then, pour this water off and pour clean water on again, repeating this operation ten or twelve times, which should be sufficient to eliminate all hypo from the plate. Just before placing the plate in the rack to dry, swab the surface with a wad of absorbent cotton, which will remove any dirt that may have adhered to the surface.
752. When orthochromatic, trichromatic or panchromatic plates are to be developed, which for best results should be in total darkness, a negative developing tank will be found very convenient. A small tank should be used - one holding but six plates 4 x 5 or 3 1/4 x 4 1/4. Such a tank will only require about 12 ounces of developer and the plates may be placed in the tank in total darkness. If the factorial method is employed, when you learn the time required for developing one plate, with a particular developer, you practically have a line on all plates developed with that formula, with the bath at the same temperature. But, it is advisable, even when the factorial method is employed, to examine the plate quickly by a weak light, before placing it in hypo, and if it does not contain sufficient strength place it back in the tank for further development. By the tank method you will not only avoid fog, but will also save the edges of the plate from becoming damaged by handling.
Illustrations. How Made.
753. In order to give the reader a clearer idea of the manner of producing results with the microscope and the manipulation of the instrument generally, we supply herewith some illustrations of different negatives made under different conditions, beginning with the most simple studies for the beginner and the more difficult ones for the advanced worker.
754. In Fig. 1, Illustration No. 129, is shown the Wing of a Fly. For this exposure a No. 1 eye-piece with a 2/3 objective was used, the illuminant being gaslight. The plate employed was a Standard Orthonon, which was given 30 seconds exposure, and developed with metol-hydro-quinon. The object in using a non-halation plate was to avoid halation. The subject being monochrome - black and white - there was no necessity for orthochromatic or color corrected plates being used.
755. In Fig. 2 we have Protoplasm and Nucleus showing chromatic threads. In this exposure a No. 1 eye-piece with a % objective was used. The plate employed was an Orthonon, with a color-screen. The exposure given was two minutes, with gaslight illumination. The color-screen was used, owing to the color being blue and red, the yellow screen correcting the blue, giving uniform tone throughout.
756. In Fig. 3 we have the May Apple Ovaries. A
No. 2 eye-piece with a % objective was used and a daylight exposure given, using a Cramer slow isochromatic plate with a yellow color-screen. The object was dark pink in color. The exposure given was three minutes.
757. Fig. 4 is an illustration of Opaque Illumination, showing the Threads of a Linen Handkerchief, which was stretched across the stage of the microscope, the light from a gas lamp being thrown upon the surface of the linen through the bull's-eye condenser. In this case an Orthonon plate was used and two seconds exposure given. A No. 1 eye-piece with a 2/3 objective was employed. The outfit arranged for making this picture is the same as illustrated for opaque illumination.
758. Fig. 5. Adeno-Fibroma (Tumor of Breast). In photographing this subject the No. 1 eye-piece with a 2/3 objective and gas illuminant were used. Upon viewing the subject through the microscope several shades of blue were visible, from very light to very dark. To tone down these contrasts the dyed yellow screen was used and a Cramer slow isochromatic plate was employed and fifteen seconds exposure given. The developer was metol-hydroquinon.
759. Fig. 6. Granulation Tissue. For this picture the No. 1 eye-piece and the 2/3 objective were used. The microscopic slide from which this picture was made was evenly stained a red color, and in making the exposure with gas illumination the dyed color-screen was employed. The plate used was a Cramer slow isochromatic, and thirty seconds exposure was given, using metol-hydroquinon for developing.
760. Fig. 7, Illustration No. 130. Adenoma of Thyroid Gland. (Tumor of Neck). This specimen shows different shades of red. The color-screen was used with gas illumination, and No. 1 eye-piece and 2/3 objective employed. Cramer slow isochromatic plate was used, and thirty seconds exposure given. This plate was developed with edinol-hydro developing solution.
761. Fig. 8, Illustration No. 130. Malignant Oedems
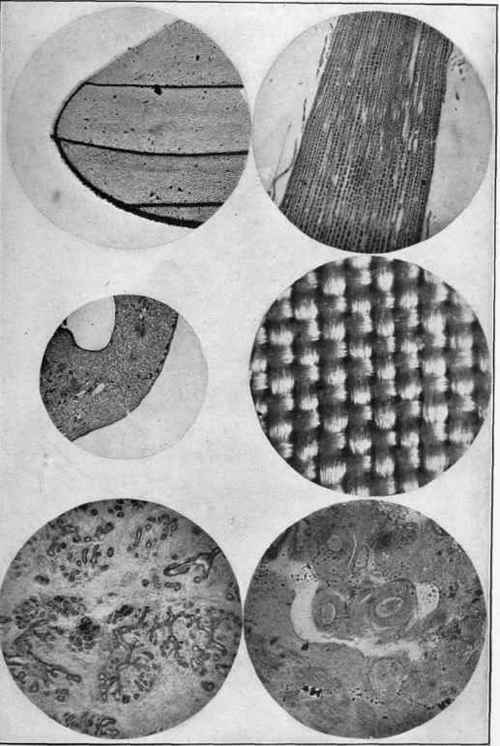
Illustration No. 129
Reproductions from Microscopic Slides
See Paragraph 754
Fig. 1. Wing of Fly Fig. a. Protoplasm
Fig. 3. May Apple Ovaries Fig, 4. Example of Opaque Illumina-
Fig. 5. Adeno-Fibroma tion - Linen
(Tumor of Breast) Fig. 6. Granulation Tissue
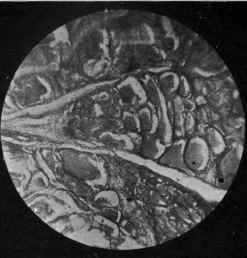
Fig. 7. Adenoma of Thyroid Gland (Tumor of Neck)
Fig. 8. Malignant Odema Bacilli (Gas Bacillus)
Illustration No. 130 Reproductions from Microscopic Slides See Paragraph 760
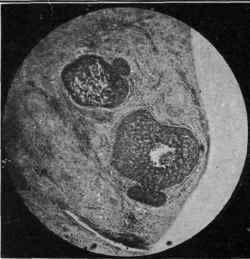
Fig. 9. Adeno-Carcinoma (Cancer).
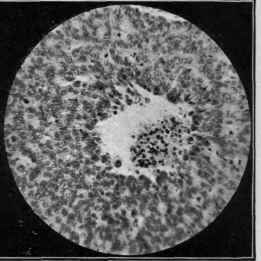
Fig. 10. Section of Fig. 9 Magnified
Illustration No. 131
Reproductions from Microscopic Slides
See Paragraph 764
Bacilli. Gas Bacillus. This bacteria photograph is mentioned under the note on Bacteria. This slide has two shades of blue, very light and very dark. The No. 1 eyepiece and the 1-12 oil-immersion objective were used with gaslight illumination. An Orthonon plate was employed with the color-screen, and an exposure of four minutes given. The developing was effected with an edinol-hydro solution.
762. In Figs. 9 and 10 of Illustration No. 131, we present the results obtained with a Bausch & Lomb Photo-micrographic camera, as used by Mr. Herman Shapiro, of Johns Hopkins' University, Baltimore, Md. This photomicrographic camera is shown in Illustration No. 127. Mr. Shapiro has devoted most of his attention to the use of the low and medium-power objectives (2/3 and 1-6) for work in histology, embracing from a 25 to 300-times magnification, and rarely 500. Higher power he employs principally for bacteriology.
763. Mr. Shapiro prefers working by daylight. He has his camera arranged on a table within two feet of a north window, and with a few plate holders loaded he is always ready for work, and it is merely a matter of from five to ten minutes for him to obtain a record, his exposures varying from ten seconds for low power (2/3) objective without ray screen to two minutes for high power (1-12) with yellow four-times screen, on an image covering a 4 x 5 plate. His large sizes he makes by enlargement, with a saving of time and money, and in addition the enlargement may be subjected to legitimate strengthening with India ink and Chinese white.
764. In Fig. 9 of Illustration No. 131, we have an Adeno-Carcinoma (cancer of a female breast). This illustration shows two areas of breaking down carcinoma. The picture was made with a low-power (2/3) objective, using a No. 3 eye-piece, and with the camera extended 14 inches, producing a picture 3 1/2 inches in diameter. The plate used was an orthochromatic, with a ten seconds exposure without a screen.
765. In Fig. 10 of Illustration No. 131, we have a magnification of the larger of the two areas exhibited in No. 9, showing very clearly the large Cancer Cells, with central clean space of necrotic or dead tissue. In making this illustration a 1-12 oil-immersion objective was employed, with a No. 3 eye-piece, and the camera extended 14 inches, producing a picture 3 1/2 inches in diamenter. For this purpose an orthochromatic plate was used, with a four-times screen, requiring one and a half minutes exposure.
Continue to:
My Books

