


80. Blind Dovetailed Joint
Description
This section is from the book "Elements Of Construction", by Charles A. King. Also available from Amazon: Elements of construction.
80. Blind Dovetailed Joint
Blind Dovetailed Joint. Fig. 153.
Material:
2 pieces, 41/2" X 3" X I".
On account of the time and skill necessary to make this joint, and from the fact that after all the work has been done, it appears no different from an ordinary miter joint, it is used only upon the finest work. It is, however, an excellent exercise in accuracy.
In making this joint, proceed as follows, observing the utmost care and accuracy at each step: 1. Marking and cutting the joint: Lay out the miter upon the four surfaces of each piece, making a distinct knife mark.
2. Lay out the square a a, indicated by dotted lines in Fig. 154, which is to receive the dovetails.
3. Cut the square a a to exact size, being careful not to cut beyond the miter lines, using a backsaw and finishing with chisels.
4. With a backsaw cut the miters, trimming with a chisel exactly to surface lines and to lines b, if the saw cut is not sufficiently accurate.
5. Mark the tails in the square of piece B and cut them by the same method used in cutting the spaces between the tails in the previous problem. To assist in accurate marking, make a templet of a piece of thin cardboard or zinc, similar to that shown in Fig. 132, on which the bevels of all the teeth are carefully laid out, and cut and use this to mark the bevels on both pieces. This may be done by measuring, if desired, but a templet makes more accurate work possible.

Fig. 153. - Blind Dovetailed Joint.
6. Lay out and cut the pins, using the templet. If a large piece of this form of construction is being made, the marking may be done by the same method as in Topic 78.
7. This joint should not be glued together, as the construction cannot then be seen. Smooth and sandpaper as in the preceding problem.
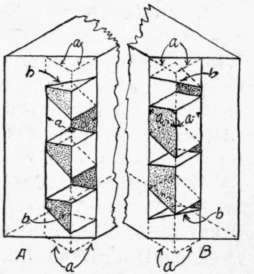
Fig. 154. - Blind Dovetail: Method of Fitting the Joint.
Continue to:


My Books

