Lesson VII. Working Drawings
Description
This section is from the book "Manual Training: First Lessons In Wood-Working", by Alfred G. Compton. Also available from Amazon: First Lessons In Wood-Working.
Lesson VII. Working Drawings
IF, instead of drawing the lines of our last lesson freehand, and writing the dimensions of the object on the drawing, we rule the lines with care, and make them all bear exactly the same ratio to the lines they represent, we have a "Drawing to Scale," or "Working Drawing," as in Fig. 15, which shows the plan, elevation, and side-elevation of a box.
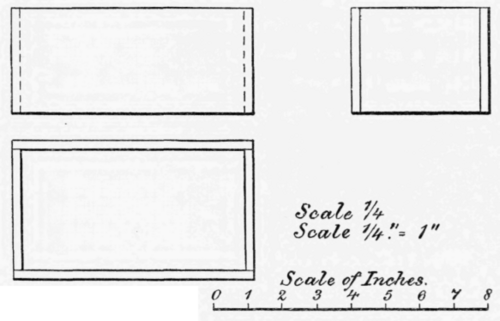
Fig.15.
The scale, or ratio of the dimensions in the drawing to the corresponding dimensions of the object must be indicated on the drawing. This may be done in either of three ways. Suppose, for instance, the lines of the drawing to be one quarter as long as the corresponding lines of the object. First, we may write on the drawing "Scale 1/4". Or, secondly, we may write "Scale 1/4" = 1"", or "Scale 3" = 1". Or thirdly, we may draw a straight line of any convenient length, divide it into parts, of which each represents one inch on the object (or one foot, or one meter), and number these parts 1, 2, 3, etc. In the case in question where the scale is 1/4, each of the parts must be actually one quarter of an inch long. If the drawing had been made to a smaller scale, as 1/12 for instance, which might be written "Scale 1/12", or "1" = 12"", or "1" = 1" the spaces would have been each one inch long, and would have represented each one foot in the object. In Fig. 15 all three of the modes of representing the scale are shown, The scale must be large enough to enable the workman to determine from the drawing the dimensions of every part of the object. Thus, in the last figure, to determine the size of the hole in the block, the workman would measure with the compasses its diameter on the drawing. Finding this to be one quarter of an inch, he would know that the diameter of the hole was to be one inch. Next, to determine where to place the hole, he would measure the distances on the drawing from two sides of the end elevation, and finding these distances to be each one quarter of an inch, he would know that the hole was to be one inch from each of the corresponding faces of the block, and therefore the center of the hole one inch and a half from each of these faces. If the scale had been much smaller, say 1/12 = 1", it would have been difficult to measure exactly the dimensions on the drawing, and therefore difficult to determine exactly the dimensions of the object. When an object is large, or contains many details, it may be impossible to make the scale large enough to show all the details in such a way that the workman can get their true dimensions from the drawing. It is then necessary to add separate drawings of some of the details. These are only working drawings on a larger scale. Of course the scale of these drawings must be indicated also.
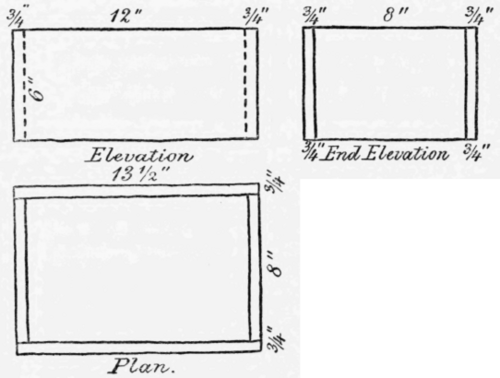
Fig.16.
In addition to the two elevations, plan, and drawings of details, there are sometimes needed other drawings, called "sections," which will be explained hereafter, when they come to be needed.
You will now be able to understand the working sketch, Fig. 16, of the box which we propose to make. The front elevation shows that the box is 13 1/2" long and 6" high, and the end elevation, or the plan, shows that it is 9 1/2" wide. The dotted lines in the front elevation show that the front and back pieces are fastened on over the ends of the end pieces. The same fact may be learned from an inspection of the end elevation and plan. The figure 3/4" shows that the wood used is 3/4" thick. As there may be a doubt whether the figures 12" and 8" in the two elevations are the inside or the outside measurements of the box, it is best to remove this ambiguity in the following way. Let the figure which indicates any dimension be written in the middle of a line drawn parallel to the line to which it belongs, and terminated by arrowheads exactly opposite the ends of the line. Thus, Fig. 17, means that the inside length of the box is 12 inches, and Fig. 18, means that the outside length is 12 inches. In a working drawing there would be no such ambiguity as this.

Fig. 17.
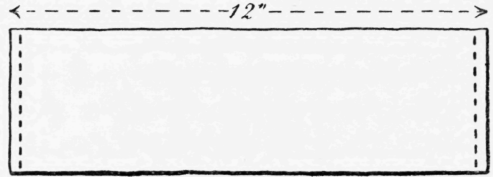
Fig. 18.
Continue to:
My Books

