Lesson XI. The Jack-Plane
Description
This section is from the book "Manual Training: First Lessons In Wood-Working", by Alfred G. Compton. Also available from Amazon: First Lessons In Wood-Working.
Lesson XI. The Jack-Plane
You have seen how the knife or the hatchet tends to follow the grain of the wood, and, if the grain happens to run inward rather than outward, splits off large pieces, thus making fine work impossible. The knife or "iron' of the plane is prevented from doing this, and so, with this tool, work may be finished up very smooth. The plane-iron, as you see, is set in a block of wood through which it projects only a short distance, and as the block rests on the surface of the wood, the iron cannot penetrate beyond this distance. If you set the plane down, on the surface of a board, and press down on it, the iron will cut into the wood until the block comes in contact with the board, and then it can go no further. If now we push the plane forward, the edge of the iron moves say from a to 6, Fig. 23; but, instead of following the grain, and cutting deeper and deeper, it is forced to remain at the same distance below the surface. It thus lifts up the thin layer or "shaving," bending it upwards as it advances, and delivering it out of the "mouth" of the plane. The tool thus described is the plane with a single iron.
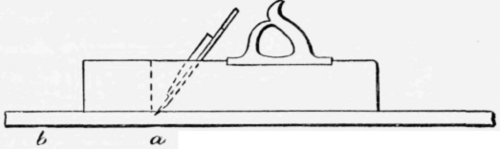
Fig.23.
When we use this tool, however, although the iron itself cannot penetrate far into the wood, it is still possible that, while the end of the shaving slides up the surface of the iron, the split, once commenced, may run some distance into the wood. In this case, the strong splinter torn up may stop the plane, or, breaking off, may leave a rough surface. To prevent this a second iron or "cap" is introduced, thus making the plane with double iron. The cap is secured to the cutting iron by a screw as in Fig. 24, and the two are put together into the block, and held in place by a wedge, as you will readily understand on examining the plane on your bench. Figures 23 and 24 should be carefully compared with your plane, by way of further illustration of the principles of mechanical drawing explained in Lesson VI (Working Sketches).
With this instrument it is impossible for the end of the shaving to slide far up the iron, and cause a deep split in the wood, because the shaving is caught by the back iron or cap and bent forward. If the cap is thick enough, and set near enough to the edge of the cutting-iron, it will bend the shaving so abruptly as to break it. As long-as the shaving was a strong stick or splinter, as at a b, Fig. 25, the forward movement of the cutting-iron tended to lift this stick up without breaking it, and extend the split down into the wood; but when the end of the splinter is turned up and broken off, as at c d, the cutting-iron cuts partly through the base of the remaining short piece, turning up a longer splinter, which is again broken off, and so on, till the splinter curls up as a thin "shaving," as at e f.
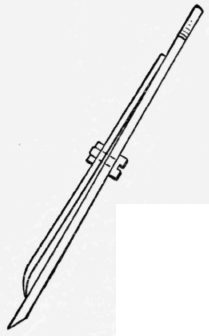
Fig. 24.

Fig. 25.
When you examine one of the thin shavings taken off by such a plane, you find that it is cracked or broken across at equal short distances. Thus it is so much weakened that the cutting-iron cannot lift it up by the end and continue the split down into the wood.
With this partial view of the mode of action of the plane we can now go on to consider the way of using it. The discussion of the several kinds of planes, and of the methods of sharpening them and of adjusting them for different kinds of work, will come later.
For your first exercise in planing, the tool called a "jack-plane' will be used. It is designed for coarse work, such as removing the rough outside of a plank, or cutting off considerable quantities of material. As it is intended to cut pretty thick shavings, the cap is set well back from the edge of the cutting-iron (1/8" to 3/16"), the cutting-iron is allowed to project considerably from the block, and its edge is curved, as you will notice, so that the middle of it projects farther, and therefore cuts deeper than the corners. Your jack-plane has been already sharpened and adjusted for the kind of work you are going to do. It is intended to plane up the sides of your box; but it will be well, before undertaking this, to try your hand on another piece of wood of about the same size. To make the exercise as simple as possible, pick out a piece which is not winding.
You find at the left end of your bench a stop or "bench-hook," to prevent the piece that you are planing from sliding forward. Examine the construction of this bench-hook. Observe how it is raised and lowered, and fastened in any desired position. Set it so that it shall stand up above your bench a little less than the thickness of the piece that you are going to plane. If your bench has a wooden "bench-pin" instead of the bench-hook the mode of adjusting this is obvious. Lay your piece of wood on the bench, with the end against the bench-hook. Hold the plane by the handle with the right hand. Take hold of the front of the plane with the left hand, the thumb being on the side nearest your body, and the fingers on the other side. This throws the left elbow up, and enables you to press down on the front of the plane. It is not, however, generally necessary to press down very hard: if the plane is sharp and properly adjusted it will take hold without this, just as the saw does. In this position, push the plane forward from end to end of the piece, trying to take off a shaving the whole length. If the first shaving is taken from the left-hand edge, let the next be just to the right of this, and so on, till you have gone over the entire breadth of the piece, not missing any portion of the surface. You will of course have to change the position of the piece from time to time, so that the portion on which the plane is working shall be opposite the bench-hook.
In the management of the jack-plane the chief points to be attended to are these:
1. During the first part of the stroke press down most with the left hand, to prevent the rear end of the plane from dropping, and so cutting off too much of the rear end of the piece.
2. In the same manner, bear down, during the last part of the stroke, on the handle of the plane, to prevent the front from falling. If these two points he neglected, the piece will present, when planed, the appearance shown in Fig. 26: a straight-edge laid upon the surface will not touch at the ends.
Exercise 15. Use Of The Jack-Plane

Fig. 26.
3. Do not continue to plane any particular spot merely because it happens to work easily: you will thus get the surface uneven, and be obliged, after all, to plane away the rest of the piece to the same level with the soft part on which you have been working.
4. Do not, as a general rule, work "against the grain," that is, in such a direction as from a to g, Fig. 25, or from c to f in the same figure. When you work thus, each fiber is torn some little distance down into the wood before it is cut off, and the result is a number of small shallow pits, deeper at one end than at the other, leaving the surface rough, as in Fig. 27, in which the appearance is exaggerated, to show the character of the effect. Planing with the grain, the tool, as it cuts off each fiber and bends it up, makes a split which runs outward, across the shaving, instead of inward into the piece, and thus leaves the surface smooth. As the grain often runs differently in different parts of the piece (as it does, for example, in Fig. 25) it will be necessary, in such cases, to turn the piece from time to time, as you work on different parts. While it is not best in general to work against the grain, it is often allowable, and even preferable, to do so when a considerable thickness of wood is to be removed, as the plane, if not set too coarse, works freer and more rapidly against the grain than with it. In this case also, however, it will be necessary, when nearly the desired amount of wood has been taken off, to turn the piece, and finish with the grain. 5. Work, whenever you can, with the plane as with other tools, with long, steady strokes. When you are obliged to turn the piece frequently, because of the crookedness of the grain, this is of course impracticable.

Fig.27.
Bearing these points in mind, and having first practiced on the extra piece of wood, you may now plane up one surface of each of your pieces with the jack-plane, provided the surface is not winding: if any surface is winding we will reserve its treatment for another exercise. When you have done this, you will find that the marks made by the saw ("saw-kerfs' they are called), as well as any stains or rough spots, have been removed; but the general surface, though clean, is now marked with a series of broad and shallow furrows or valleys separated by low ridges which are due to the curved form of the iron, and which will appear very conspicuous if you lay a straight-edge crosswise on your piece. In our next lesson we will endeavor to remove these furrows and make the sur-face smooth.
Continue to:
My Books

