How To Make A Tooth-Brush Rack
Description
This section is from the book "Carpentry For Beginners - Things To Make", by John D. Adams. Also available from Amazon: Make Magazine.
How To Make A Tooth-Brush Rack
Tooth-brushes look so much alike that it is really very necessary to have a separate place for each brush, and as it is not sanitary to have the damp bristles rubbing around on some dusty surface, we should either hang the brushes up or stand them on end. As most brushes have no holes in the end, the best plan is to make the little rack illustrated, which makes a very neat addition to the bathroom when it is white enameled. This enamel comes in small cans and is applied with a brush just like paint. While one coat will do, a much nicer finish will result if the first coat is lightly rubbed with very fine sandpaper and a second one added. Be sure that the first is not only dry but hard before rubbing.

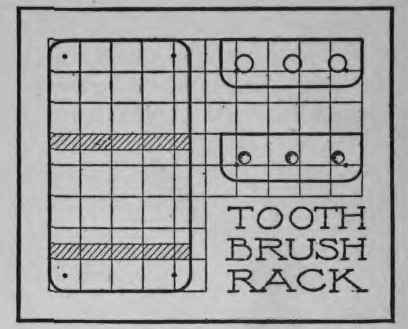
The woodwork is very simple. The pieces should be three-eighths or one-half inch thick, and the proper sizes can easily be determined from the working drawing by counting the number of one-inch squares. The only difficulty you may have will be in boring the three holes in the top piece without splitting. This can be avoided by boring the holes in a piece several inches too long and then cutting off the ends to the proper length. As soon as the point of the bit comes through, turn the wood over and bore from the other side, so as not to make any splinters. Sandpaper the insides and edges of the holes perfectly smooth. In the bottom piece three hollow spots must be gouged out to keep the lower ends of the brushes from slipping around. Set the points of the compasses one-half inch apart and mark the corners for rounding. Attach the top and bottom pieces to the back by nailing in from behind, and after the enameling is done place a screw eye in the top for hanging.
Continue to:
My Books

