How To Make Window Boxes
Description
This section is from the book "Carpentry For Beginners - Things To Make", by John D. Adams. Also available from Amazon: Make Magazine.
How To Make Window Boxes
In making flower boxes for windows one encounters a variety of conditions. Very frequently window sills slope downward toward the outside, in which event the bottom of the box must be set at a corresponding angle.

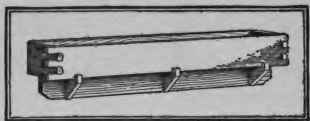
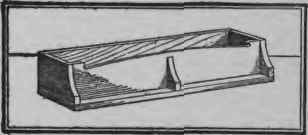
This design can be used to advantage where the sill is of such a depth that the box can be set back far enough to bring the inner surface of the front board into contact with the face of the sill. Carefully mark out the shape of the front board, and then work it out, finishing all edges sharp and square. The shape of the two end boards will, of course, depend on the depth and angle of the sill. In the sectional view is shown the arrangement of the spout for carrying off the drippings. In order to conceal this, a groove should be cut on the inner side of the front board, and a hole bored in the bottom. Put the whole together with screws, using those with round heads in front. Before lining with zinc, a coat of paint will add greatly to the life of the box. If one is fairly familiar with the use of the soldering iron, there ought to be no difficulty in placing this zinc lining. This, however, can be readily attended to at the tinsmith's. The upper edge of the lining should be well secured to the inside of the box by means of galvanized or tinned tacks, so as to prevent rusting. The box may be stained Flemish green or any color desired. Where the window sill is of fair depth and has a square edge, such as a dressed-stone sill, the third design may be used to advantage. On the under side of the bottom, and at right angles thereto, a four-inch board is attached, and then three wooden brackets placed in position as shown. This arrangement makes the box appear as though supported by these brackets, whereas the actual fastening is accomplished by setting in two screw eyes in the back, which are then tied by wire to two similar screw eyes set in the wooden part of the sill. (See the sectional view.) The two front corners may seem a trifle elaborate at first sight, but in reality their construction will be found quite simple. After the tongues and grooves have all been fitted in place a wire nail should be driven in at the top and bottom, so as to hold them together. The bottom, back and ends are all plain boards, and in putting these together it is preferable to use screws. The arrangement of the drain is clearly indicated. This is a very attractive design and is well worth a little effort on the part of the one doing the work to make it carefully and neatly and finish it up in good, workmanlike fashion. Make all measurements accurate and all fittings true and exact.

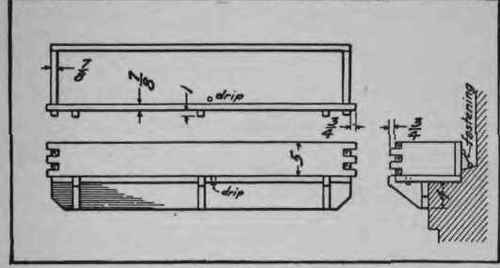
When the angle of the sill is too great, or the width too little, it is usually best to make the bottom of the box square with the sides, and then provide a screw eye at each of the two front corners, so that the box may be held in place by means of two chains, as shown in the diagram to the left. All of the lines are quite simple, but in order to bring them out fully, care should be taken to have the edges of the various boards sharp and square. A hole should be bored in the middle of the bottom board near the front, to accommodate the drip spout, which should be soldered tightly to the zinc lining, and which should preferably extend a trifle below the bottom of the box, so as to keep the drippings away from the wood. Stain dark brown or Flemish green. The depth of all these boxes may vary from four to seven inches and the width from five to twelve inches. Of course the dimensions of the window where the box will be placed will govera this. The lumber used should be about an inch in thickness.

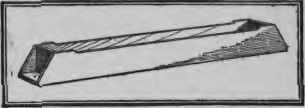
The long narrow box is for use along the porch rail, and the construction is so simple that nothing need be said in regard thereto. To hold securely in place, a screw should be set in at each end through the projecting ends of the bottom board into the porch rail. A good substitute for the metallic lining consists of thoroughly coating and impregnating the inside and drip holes with heavy crude oil or tar residue, such as may be obtained from the gas works. Two or more applications should be given, after each of which the box should be placed in the sun until thoroughly dry.

To entice the birds to nest about our homes two things are equally necessary - the first is to provide the proper sort of a house and the second to place it in a suitable location. A woodpecker or a flicker invariably take up lodgings at the bottom of a deep, dark hole, while the robin and the phoebe prefer lots of light, and a house to suit them must have the whole side knocked out. The same radical difference in taste is displayed in the matter of location. A catbird likes to be near the ground among shrubbery, while the house-finch, true to his name, must live high up near the eaves. It will therefore be apparent how important it is, before commencing actual construction, to make a general survey of one's neighborhood to ascertain the different kinds of birds that are available and to determine the most suitable points at which to place the new houses. In doing this one should remember that unless a great deal of space is at one's disposal it is hardly to be expected that more than one family of any species can be secured, except in the case of martins, which are noted for their social instincts. With this single exception all of our common birds have a marked dislike for others of their own species, particularly during the breeding season, although it is not uncommon to see different sorts nesting quite close together.
Continue to:
My Books

