Gauging
Description
This section is from the book "Woodwork Joints", by William Fairham. Also available from Amazon: Woodwork joints.
Gauging
After squaring all the shoulder lines round the timber with the knife and try square, the mortise gauge should be set so as to strike the two gauge lines marked G, Figs. 83 and 84, at one operation. If the worker does not possess a mortise gauge the lines may be marked at two distinct operations with the aid of the marking gauge ( Fig. 82 ). The gauge should be adjusted so as to mark the wood into thirds, and the stock of the gauge (the portion of the gauge containing the thumb screw in Fig. 82 ) must be used from the face side of the timber when gauging up the whole of the pieces forming a frame. The face mark on the work is indicated by a glorified comma, and the edge mark is shown by X, as in the various illustrations. Fig. 82 shows the method of holding the gauge in the right hand whilst gauging the lines on the work.

Fig. 82. - Gauging the Timber.
The joint, when marked out, will appear as at Figs. 83 and 84, and the portions which are to be cut away may be shaded with a pencil as indicated; this will prevent mistakes arising whilst cutting the work, especially by one who is not thoroughly familiar with the joint.
The distance A B, in Fig. 84 , must not be less than the distance A B in Fig. 83 .
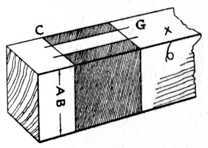
Fig. 83 .
Continue to:
My Books

