The Workbench
Description
This section is from the book "Handy Man's Workshop And Laboratory", by A. Russell Bond. Also available from Amazon: Handy Man's Workshop And Laboratory.
The Workbench
The workbench shown in Fig. 1 is attached to the wall, thus saving time and labor in making it; but a stationary workbench is not always desirable, especially if there is no permanent shop for it. The standard size of a joiner's bench is 12 feet in length and 2 feet 9 inches in height and width. This size is altogether unnecessary for home purposes. From 8 to 9 feet in length, and about 32 inches high is a convenient size. Mechanics sometimes test the height by sitting on the front edge of the bench sideways. with one foot dangling over the side, which should just touch the floor.

Fig. 11 - The skeleton framework of the bench.
If the planking and supports are made of yellow pine, a sound solid bench will be the result. In any case, the top front plank should be of this material, the rest can be of white pine or hemlock. The vise should be of oak, the screw being purchased at any hardware store for about fifty cent-.
Referring to Fig. 11. three of the supports are made of 3 by 4-inch timber, 30 inches high. The one at the vise is 3 inches by 6, of the same length. Care should be taken that the bearing surfaces are true, and the posts are set up level. The slotted hole, or mortise, at the bottom of the vise post, should be cut before the post is set up, but the round hole for the screw can be made when the bench is complete. The mortise is made by boring two J,s-inch holes 2 inches apart, vertically, and cutting out the wood between with a flat chisel. The ends, top, and bottom can be left round, or may be squared up with the chisel, as illustrated.
* Figures refer to authors' names. See Index of Authors at end of book.
Cut three short lengths of 1 by 10-inch boards, 23 inches long, and nail two of them across the tops of the posts or supports as shown. Set them up on end, and nail the front board, or apron, which is 9 feet in length, to the forward posts, spacing the latter 1 foot from each end. The top edges of the front board and the three cross pieces are brought up exactly level with each other, but the back board, which is 12 inches deep, is nailed to the posts, with the top edge 2 inches above. The top of the bench consists of two planks, 12 inches wide by 9 feet in length. The front plank is 2 inches in thickness, and should bear evenly along the top edge of the front board, or apron, which supports it. The board at the back is only 1 inch thick, and like the rest of the bench, can be made of cheaper and lighter timber. With the exception of the tool rack, the bench can be put together with eightpenny or 2 1/2-inch wire nails. The 2-inch thick plank should be nailed down with ten-penny flooring nails, or nails having finished heads, which must be driven in below the surface with a nail set or punch.
The tool rack can be made from 1/2-inch stuff, about 2 inches wide, running the full length of the bench, or cut off within a foot or so of each end. Partitions can be made of the same wood, spaced from 1 to 3 inches apart, to suit various sized tools. A strip of wood nailed across the top edge of the back, and furnished with a number of different-sized, bored holes, will answer the purpose just as well.
While there are many different kinds of vises on the market, it is safe to say the old style, as shown in Fig. 12, is very generally used, and it has the advantage of being easily rigged up and inexpensive. Procure a piece of oak. 1 1/2 inches thick, 7 1/2 inches wide, and about 30 inches in length, for the movable jaw of the vise. A hole for the screw is bored in the middle, 9 inches from the top, and a mortise for the guide is made in the lower end. after being marked off from the one in the 3 by 6-inch post of the bench. Corresponding holes for the vise screw are to be bored through the apron and the post, a trifle larger than the screw. The guide is made from hard wood, 18 inches in length, cut to fit easily the hole in the bench post, but having a driving tit in the vise jaw. to which it is secured by toe-nailing. Sometimes the jaw of the vise is tapered at the lower end, as shown in the detail view, Fig. 13, when the guide can be secured by driving nails through the sides. The guide is furnished with holes evenly spaced, as shown, and a peg is provided, similar to the one shown in Fig. 11, for the apron or front board of the bench.

Fig. 12 - The bench complete with vise and tool rack.
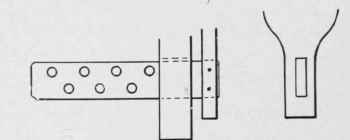
Fig. 13 - Details of the heel of the vise.
The apron is provided with holes and a peg, to rest the free end of a long plank upon, when being worked in the vise. A suitable bench stop is put in the planing board of the workbench. Various designs are on the market, which can be easily attached, but a very good one can be made by using a 2 by 2-inch piece of oak, a foot in length. A hole is cut about 9 inches from the end of the bench, and the stop must have a driving fit, being raised or lowered by hitting it with a hammer. This is much better than the metal stops, since there is no possible chance of injuring the tools. The nut of the vise screw is secured to the inside face of the 3-inch by 6-inch post, to prevent its revolving when adjusting the vise.
When the vise is set up, the top can be planed true and level with the working face of the bench, slightly rounding off the corners. The 2-inch plank should be planed up true, and no work done upon it which will break up the surface. Any rough work should be done on a board placed on top of the bench.
The workbench is now complete. It is a convenient size, and can be easily taken out through an ordinary door, and when it comes to moving, there will be no necessity of leaving it behind, or knocking it to pieces to get it out of the shop.
Continue to:
My Books

