Chapter II. Drawing
Description
This section is from the book "Manual Instruction: Woodwork. The English Sloyd", by S. Barter. Also available from Amazon: Manual Instruction: Woodwork.
Chapter II. Drawing
The importance of drawing in a system of manual training has already been urged. The drawing used in connection with manual training is, of course, sometimes mechanical and sometimes freehand, though in woodwork chiefly the former. All drawings, however, should be made to a scale. The mechanical drawing generally consists of plans, elevations, sections, and isometric projections of the models and exercises. The theory of elementary projection must be thoroughly understood by the teacher, who should also have a sufficient knowledge of plane geometry.
Of course, anything like an exhaustive treatise on geometry is impossible here, but, as in the case of some readers it may be useful, enough of the theory of projection, and of the particular plan of execution recommended, is given for the purpose of manual training.
For the present course only two set-squares, a T-square, scale, and a pair of dividers are required. Set-squares are flat, triangular pieces of pear wood or vulcanite, and are used for drawing lines at given angles to other lines. One of the angles of a set-square is invariably 90°, and of a necessity the sum of the other two angles is 90°. These angles vary indefinitely, but the most common, and the only set-squares used in this course, have their angles respectively 90°, 45°, and 45°, and 90°, 60°, and 30°. The proper use of these two set-squares will be found to facilitate the drawing of the exercises very much. If a series of parallel lines either at right angles to a given line or at an angle of 30°, 45°, or 60° to it are required, the set-square containing this angle may be pushed along the edge of the other one, and parallel lines drawn in its course, as at a a a a in fig. 1. Now if from one of these lines just drawn it should be required to draw more lines at, say, 30°, it will only be necessary to take the square a and slide it along the edge of b, as shown in the figure, making the lines bbbbb. Parallel lines to any given line on the paper may always be drawn with the two set-squares by this method.
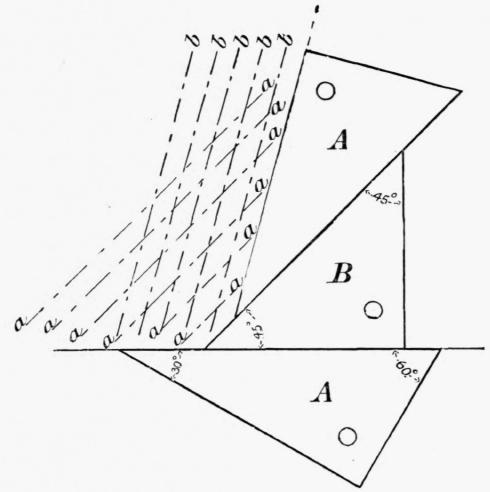
Fig. 1.
Many plane geometrical figures can be drawn very rapidly by the application of this plan, which is much less liable to error than any other, while equally as scientific. The saving of time which can be made by a knowledge and proper use of the set-squares is in some drawings astonishing. It must not be understood that boys should not be taught the usual method of finding angles with the compass and straightedge, but when working drawings are required the use of the two set-squares becomes a practical necessity. The T-square need not be of any particular size. It consists of a blade and a stock, usually of pear wood or mahogany. The blade should be screwed on to the stock, as shown in fig. 2, not, as is sometimes the case, mortised into it. This enables the set-square to slide along the edge of the blade across the stock when necessary.

Fig. 2.
The drawing edge of the blade should, of course, be at right angles to the stock and bevelled along the top edge, but it is preferable for the other edge to make a slightly greater angle, the blade consequently tapering somewhat to the end.
The hole at the end of the blade is for hanging up the square when not in use, and this should be always attended to, as, besides saving risks, the hanging position helps to keep the square true. T-squares should at no time be exposed to great heat, damp, or much sunshine, which will all cause warping and other defects.
The T-square is of great use in drawing a series of parallel lines at right angles to the sides of the board, but care should be taken to always use the square with the stock on the left-hand side of the board, and all lines should be drawn along the top edge. It is to prevent the possibility of drawing from the opposite edge that the taper blade is recommended. It has been said that drawings should invariably be made to scale, and it will be found that this form of drawing necessitates thought in working, and will become a very valuable form of mental training if well taught.
Not for this reason alone should scales be used to work from. Frequently a draughtsman who may have to execute a drawing of, say, a large piece of machinery will, by reducing all the dimensions in the same ratio, make a drawing no larger than a page of this book. To avoid a separate calculation in reducing each part, the draughtsman decides what proportion his drawing must bear to the original, and constructs a scale in which a small arbitrarily fixed measurement shall always equal a given larger dimension on the original copy. Thus, if the drawing is to be 3 inches long and the machinery to be drawn is 6 feet long, then each 1/2 inch on his drawing will always equal 1 foot.
This is drawing to scale 1/24
Continue to:
My Books

