Clamping The Saw
Description
This section is from the book "Workshop Receipts For Manufacturers And Scientific Amateurs. Supplement Aluminium To Wireless", by The Chemical Publishing Co.. Also available from Amazon: Workshop Receipts For Manufacturers And Scientific Amateurs.
Clamping The Saw
The first thing to do in filing a saw is to place it in a suitable clamp. Good clamps are to be found in the market, but, in the absence of such, a very satisfactory one can be made by dressing up two strips of board, three inches or so wide, having the faces that come together slightly rounded from end to end (convex) so that they will hold the saw firmly in the centre. The upper outside edges should be bevelled at about 45 degrees so that the file can approach the saw. A screw will hold the strips together at one end while the other end- which should be cut away for the handle so that all the teeth will be cleaned-may be held in a vice. In this clamp the saw should be held so tight that there shall be no vibration, Fig. 188.
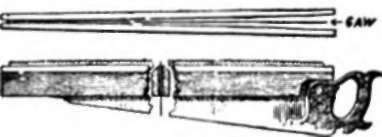
Fig. 188.
Jointing
--The saw is then ready to be jointed. Sufficient care is not usually taken in this operation, for a little rolling of the jointing file will make the teeth irregular in length. The file should be held at right angles to the sides of the saw squarely on the top of the teeth. This is difficult to do if the file is held in the hand.
A very good device is made by taking a block of wood, say 4in. or so long and 1/2in. thick by 21/4in. wide, and boring a hole lengthwise through it, the hole to be a little smaller than the face of a three-cornered file (a wornout one is as good as any). Drive the file into the hole, then from the bottom of the block cut a saw kerf square with the face of the file at its centre, Fig. 189. This makes a good gauge for jointing. A flat file can of course be used in the block instead of the three-cornered one. A round piece, as for instance, a large chisel handle or a doorstop, could be used instead of the block and treated in the same manner as described. Special devices for this purpose are found in the market.
In jointing take ofr the smallest amount possible, making all teeth the same length as the shortest one.
The line of the points of the teeth should be left in a slight curve from the heel to the toe, or be " crowned " as it is sometimes called.
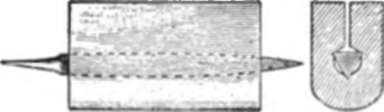
Fig. 189.
Regulating
I f the teeth have become irregular and it is necessary to joint considerably from the points, first regulate them by filing square across every tooth, filing back on the larger ones, bringing them nearly to a point, making all points of the same size. If now the teeth are all of a size, the grooves at their bases will be in a line parallel with that at their points the whole length of the saw. In regulating it is well to look at their bases as well as at their points. The pitch of the tooth also should be looked to while regulating.
Setting
After jointing and regulating, if regulating has become necessary, the setting should be done.
The setting of a saw is more important than is generally believed. A saw properly set will run more smoothly through the wood, thus saving the strength of the user and will permit him to work closer. The teeth should be bent with perfect uniformity and in a manner to squeeze the metal so that the teeth will be " set," i.e., fixed in their new position. Teeth that are only bent and not " set " will spring back unevenly. The first so-called saw sets only bent the teeth, but a blow from a hammer displaced the metal ; therefore some of the older men still insist that a hammer-set saw is best. Saws set by the Taintor Positive Saw Set are claimed to hold their set longer than when set by a hammer or hammer-set.
A saw should be set as little as may be and still have it " clear." It is a common fault of workmen to set their saws too much, and it is often the case that they are set so wide that the chip or saw dust gets between the end of the tooth and the wood, which is being cut, thus causing binding. Medium size teeth should be set about one-half way down from the points to their roots and coarse ones about one-third of the way, but never as low as the roots.
Continue to:
My Books

