Lesson XIV. The Chisel
Description
This section is from the book "Manual Training: First Lessons In Wood-Working", by Alfred G. Compton. Also available from Amazon: First Lessons In Wood-Working.
Lesson XIV. The Chisel
Observe the form of the inch chisel on your bench. Its back is perfectly straight and flat. Its face makes with its back an angle of twenty-five degrees, and just at the edge is a short face which makes with the back a somewhat larger angle, namely, 35°. This form is given to the chisel in the following way: First, it is held on the grindstone till the face A B, Fig. 34, is formed, making with the back the angle 25°. Then the part near A is rubbed on the oilstone, in a manner which will be explained presently, making the narrow face A D. This face is exaggerated in the figure, to make it clear; it should be less than half as wide as it is there shown. If you examine the chisel on your bench, which is in good condition, you easily detect on D B the scratches made by the grindstone, while A D, which was finished on the fine-grained oil-stone, is smooth and bright, and the edge at A is very keen. This is the condition in which the chisel and all similar cutting tools should be constantly kept. When the tool is dull you cannot do fine work with it; and, moreover, in trying to force it you are very apt to make it slip and cut yourself, so that a dull tool is really more dangerous than a sharp one.
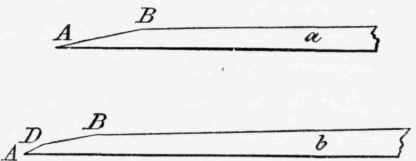
Fig. 34.
The chisel and the plane have the same form of cutting edge and require the same treatment. Other cutting tools resemble these in general, but differ in respect to the size of the cutting angle, and some other particulars. It will be readily understood that if the tool is to be used on hard material, it must be stronger, to prevent its breaking or "nicking" on the edge, and therefore the angle must be larger. As we become acquainted with various tools for cutting wood and metals we shall find that this angle has very different values, reaching even to 90° in some lathe-tools for cutting metals.
There are several different ways of holding the chisel, according to the kind of work to be done and the force required.
1. In paring off thin shavings the chisel is intermediate, as to the quality of the work it can do, between the knife and the plane. We will take, for an exercise of this kind, a piece of pine or of whitewood with a rough or crooked edge, which we will make straight and smooth as in Exercise 4, but with the chisel instead of the knife. We will cut from a 1 1/4" or 1 1/2" plank a piece 9 inches long, and will split from this, with the hatchet, pieces about 2" wide. We will select for the purpose a plank which, though of good quality, is not very straight-grained, so as to give us some little difficulty in dealing with the grain.
Holding one of these pieces in the vise, with one of the crooked edges upward, take the end of the handle of the chisel in the hollow of the right hand, the thumb and first finger lying forward on the handle, and the other fingers curved under and grasping it.
Lay the back of the chisel (not the beveled side) flat on the surface of the wood, and hold it down with two or three fingers of the left hand lying on the blade, a little way back from the edge. Pushing the chisel forward it will now cut off projecting masses very much as the plane does. (If the edge of the piece is very crooked, so that much wood has to be removed, as in Fig. 4, p. 10, it may be scored and split, exactly, as in the exercise with the knife or the hatchet.) This operation of paring is very simple so long as the grain is quite straight, or even when it is moderately crooked, provided you can work with the grain: it is only necessary to push the chisel with a steady movement lengthwise along the piece, and the back of the chisel, like the sole of the plane, prevents its entering too deep. But when the grain is very irregular, so that as the tool advances you find it working now with the grain and now against it in quick succession, it will be found best to work with a sliding rather than a pushing movement, obliquely, across the grain rather than along it. Thus, if the grain runs as shown in the elevation A, Fig. 35, then, in paring the upper edge, shown in plan at B, if the chisel moves from right to left, it will work against the grain in going over the spaces b c, d e, f g, etc., and with the grain over the spaces a b, c d, e f, etc. It will be found best, then, as it is not practicable to reverse the direction of the work so often, to lay the chisel on the work, not as shown in Fig. 36, but obliquely, as in Fig. 37, and in moving the chisel, not only to push it in the direction of the arrow a, but to give it, at the same time, a sliding motion towards the right or left. . The first movement alone would make the chisel come out at 0; the second would bring it out at P; the two movements together make it come out at Q. This sliding movement of the chisel, like that of the knife already spoken of (see p. 4) is very important, and you should take pains to get command of it. With it wood can be pared smooth which would be quite unmanageable without it. The reason of this can now be easily understood. The edge of a knife, chisel, or plane, however keenly it is sharpened, is always more or less jagged like a saw. On some tools you can feel the inequalities or teeth with the finger, and even when, as in a well-sharpened razor, you cannot feel them, you can see them under a microscope. When the tool has the sliding movement that has been described, these teeth catch the fibers crosswise and cut them off, while, if it is pushed straight forward, it forces itself between the fibers, as a wedge, and splits them apart along the grain.
Exercise 25. Paring With Chisel
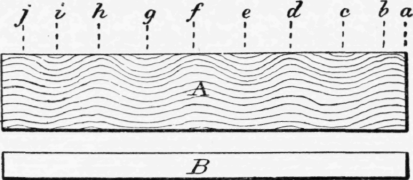
Fig. 35.
Fig. 36.
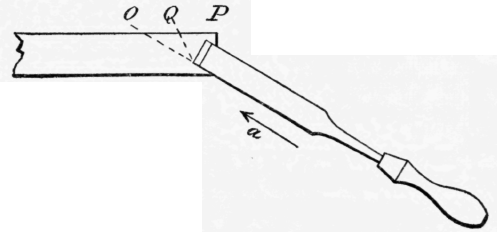
Fig. 37.
Paying attention to the points just mentioned, you may now, drawing a straight line on your piece of wood about a quarter of an inch back from the edge, pare the edge down to the mark, making it straight, square, and smooth. Test your work carefully with respect to all these requirements, and do not be satisfied till you have produced a really good result.
Continue to:
My Books

